The countershaft box (also known as the countershaft housing or intermediate shaft casing) is a critical structural and protective component in cone crushers. It serves as an enclosed housing that supports and positions the countershaft assembly (including the countershaft, bevel gears, and bearings), while isolating the transmission components from external dust, debris, and moisture. Its primary functions include:
Providing rigid structural support to maintain the alignment of the countershaft and gears during high-speed rotation and heavy loads.
Protecting internal components from contamination, which could cause premature wear or failure.
Acting as a barrier to contain lubricants, ensuring they remain within the transmission system to reduce friction.
Dampening vibrations generated by the rotating countershaft, thereby reducing noise and enhancing overall equipment stability.
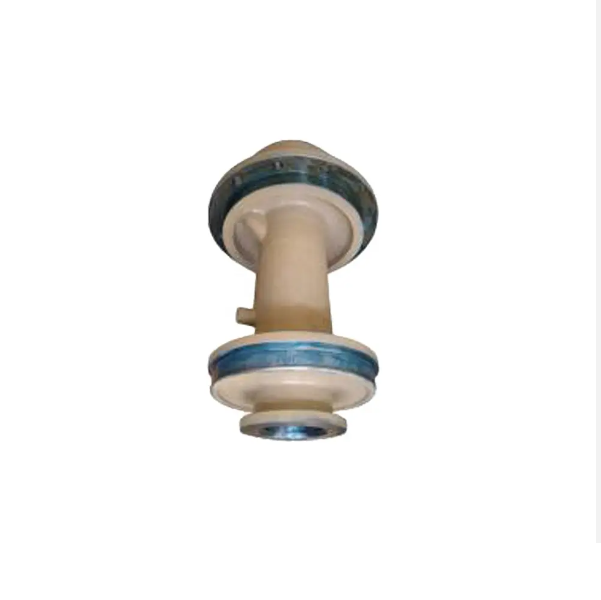
The countershaft box is a robust, typically cast-iron enclosure with a modular design, comprising the following key components and structural features:
Box Body (Housing): The main enclosed structure, usually a one-piece or split (two-piece) casting with a hollow interior to accommodate the countershaft assembly. It is designed with mounting flanges or bolt holes to secure it to the crusher frame, ensuring positional stability. The inner walls are machined to precise tolerances to fit bearing seats and seal components.
Bearing Seats: Integrally cast or machined recesses within the box body that house the bearings supporting the countershaft. These seats are cylindrical or tapered (matching the bearing outer rings) and must maintain strict coaxiality to prevent shaft misalignment.
Lubrication Ports: Drilled holes or threaded fittings on the box body to connect lubrication lines, allowing oil or grease to flow into the bearings and gear meshing areas. Some ports include check valves to prevent backflow.
Sealing Flanges and Gaskets: If the box is split (two-piece), flanges along the mating surfaces are fitted with rubber or metal gaskets to prevent lubricant leakage and block external contaminants.
Inspection Covers: Removable panels (often bolted) on the box body to allow access for maintenance, such as bearing replacement or lubricant checks. These covers are sealed with O-rings to maintain enclosure integrity.
Ventilation Holes: Small openings (fitted with filters) to equalize internal and external pressure, preventing the buildup of heat or moisture that could degrade lubricants.
Gear Clearance Adjustment Features: Some designs include shim slots or adjustable plates near the bearing seats to fine-tune the axial or radial clearance of the countershaft gears, ensuring optimal meshing.
The countershaft box body is primarily manufactured using sand casting, with the following steps:
Material Selection: Gray cast iron (HT250 or HT300) is preferred for its excellent castability, high rigidity, vibration-damping properties, and cost-effectiveness. For heavy-duty crushers, ductile iron (QT500-7) may be used to enhance impact resistance.
Pattern Making: A wooden, metal, or 3D-printed pattern is created to replicate the box body’s geometry, including flanges, bearing seats, and internal cavities. The pattern includes shrinkage allowances (1–2% for cast iron) and draft angles (2–5°) to facilitate mold removal.
Molding: Resin-bonded sand is used to form the mold cavity around the pattern, ensuring high dimensional accuracy. Cores (made of sand or metal) are inserted to create internal features like bearing seats and hollow chambers. The mold is cured to harden the sand, ensuring stability during pouring.
Melting and Pouring: Cast iron is melted in an induction furnace at 1400–1450°C, with chemical composition adjusted to achieve a carbon content of 3.2–3.6% and silicon content of 1.8–2.2% for optimal fluidity. The molten metal is poured into the mold via a gating system, with controlled pouring speed (5–10 kg/s) to avoid turbulence and ensure complete filling of thin-walled sections.
Cooling and Shakeout: The mold is allowed to cool for 8–12 hours (depending on size) to prevent thermal cracking. Once cooled to room temperature, the casting is removed from the mold via vibration (shakeout), and excess sand is cleaned using compressed air or shot blasting.
Heat Treatment: The casting undergoes stress relief annealing to eliminate residual stresses from cooling. It is heated to 550–600°C, held for 2–3 hours, then slowly cooled to 200°C before being air-cooled. This step prevents warping during subsequent machining.
Casting Inspection: Visual inspection checks for surface defects (e.g., cracks, sand holes, or incomplete filling). Ultrasonic testing (UT) is performed on critical areas (e.g., bearing seats and flange mounting surfaces) to detect internal flaws like porosity or shrinkage, which could compromise structural integrity.
After casting, the box body undergoes precision machining to meet functional requirements:
Rough Machining:
The outer surfaces, flanges, and mounting holes are milled or turned to remove excess material, establishing basic dimensions with a machining allowance of 1–2 mm.
Bearing seats are rough-bored to approximate size, ensuring they are concentric with the box’s central axis.
Finish Machining:
Bearing seats are precision-bored and honed to achieve IT7 tolerance, with a surface roughness of Ra1.6–3.2 μm to ensure proper bearing fit. Coaxiality between opposing bearing seats is controlled to ≤0.02 mm/m.
Mating flanges (for split boxes) are surface-ground to achieve flatness ≤0.05 mm/m, ensuring a tight seal with gaskets.
Lubrication ports and threaded holes are drilled and tapped to specifications (e.g., M10 or G1/4 threads), with deburred edges to prevent seal damage.
Surface Treatment:
The outer surface is painted with anti-corrosive primer and topcoat to resist environmental damage.
Internal surfaces (excluding bearing seats) may be coated with a rust inhibitor to protect against moisture when not in use.
Assembly with Components:
Bearings are pressed into the machined bearing seats, with interference fits to prevent slippage.
Gaskets are fitted to split flanges, and the two halves are bolted together with uniform torque (typically 30–50 N·m) to ensure even pressure.
Inspection covers, seals, and ventilation filters are installed, followed by pressure testing to verify no leaks.
Material Validation: Cast iron samples are tested for chemical composition (via optical emission spectrometry) to ensure compliance with HT250/HT300 standards. Tensile strength and hardness (180–240 HBW) are verified via mechanical testing.
Dimensional Accuracy Checks:
Coordinate Measuring Machines (CMM) are used to inspect critical dimensions, including bearing seat diameter, flange flatness, and hole positions.
A dial indicator is used to verify the coaxiality of bearing seats and the perpendicularity of mounting flanges relative to the box’s central axis.
Structural Integrity Testing:
Pressure testing: The assembled box (with covers sealed) is filled with oil and pressurized to 0.3–0.5 MPa for 30 minutes, with no leakage allowed.
Ultrasonic or magnetic particle testing (MPT) is performed on high-stress areas (e.g., flange corners) to detect cracks or fatigue.
Functional Testing:
After assembly with the countershaft, rotational tests are conducted to ensure the shaft spins freely without binding, indicating proper bearing seat alignment.
Lubrication flow tests verify that oil reaches all critical points via the ports, with flow meters confirming adequate volume.
Final Inspection: Each countershaft box is visually inspected for surface defects, and a certificate of compliance is issued, documenting dimensional checks, material test results, and pressure test outcomes.
In summary, the countershaft box is a vital component that ensures the countershaft assembly operates efficiently and durably. Its robust casting, precision machining, and strict quality control collectively contribute to the reliable performance of the cone crusher under heavy-duty conditions
How to disassemble the transmission shaft frame of the cone crusher
1. Disassemble all the oil pipes that affect the disassembly of the transmission shaft frame.
2. Remove the pulley according to the disassembly steps of the pulley. This is to avoid damage to the pulley during the disassembly of the transmission shaft frame.
3. Remove the screws that fasten the transmission shaft frame and the frame, and then screw the supplied special jacking screws into the three threaded holes evenly distributed on the outer flange of the transmission shaft frame.
4. To prevent the transmission shaft frame from being resisted in the frame, the jacking screws should be screwed in one by one. The temperature of the rack hole and the ambient temperature are about 55°C higher. This method can help disassembly. Until the drive shaft frame is separated from the frame body.
5. Put a long tube on the pulley end of the transmission shaft to keep the balance of the whole part. Remove it with the help of a crane or other suitable lifting equipment.
6. Remove the oil collector, and then heat the oil slinger to about 30°C higher than the ambient temperature.
7. Put a crowbar between the transmission shaft frame and the oil slinger, and apply appropriate pressure. Once the oil slinger ring is loose, grasp the two sides of the oil slinger ring and remove it from the shaft. The inner hole of the oil slinger is equipped with O-rings or graphite stained with sealant to prevent the leakage of lubricating oil along the drive shaft. Be careful not to damage the seal during the disassembly of the slinger ring. It must be replaced before reinstallation if the seal is damaged.
8. Remove the transmission shaft from the transmission shaft frame.